環境設定
(如您的版本是1.2,請先更新至2.0以上版本,然後重新下載第2步的電腦端程式)
1 安裝JAVA執行程式,請至下面連結下載
Download
2 下載電腦端程式WINRemoteService_1.0.rar,然後解壓縮,會看到有三個檔案(winremote_1.0_x64, winremote_1.0_x86, WINRemoteService_1.0, 前二者為32位元及64位元的程式庫,第三個就是執行檔)
Download
3 藍芽配對,先點選右上角案鈕,然後選擇"是"
進入控制台\硬體和音效\新增Bluetooth裝置,此時會電腦已找到您的手機(我的是GT-I9300),
然後點選按下一步
看到配對碼後一樣按下一步
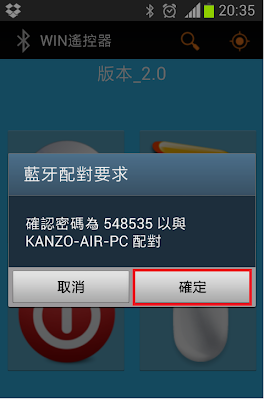
在上個步驟後,手機端會出現對畫框如下,按下確定,即完成配對設定,
****上述這些設定只需做一次即可****
=========================================================
如何使用
1.點擊電腦端的WINRemoteService_1.0,來開啟服務
(少數的使用者會看到WINRemoteService_1.0變成RAR, 如果是的話,請點選此檔案,及按滑鼠右鍵,然後選"開啟檔案",最後選擇"JAVA(TM) platform SE binary)
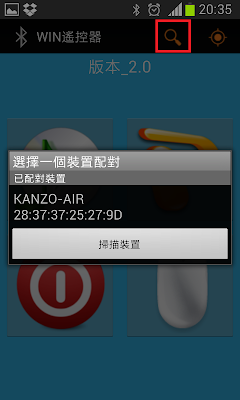
2.點選右上角的按鈕,然後點選裝置名稱(KANZO-AIR是我的電腦名稱)
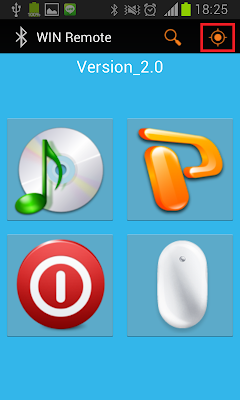
3.連接成功,可開始遙控嘍
=====================================================================
下載WIN遙控器連結:
http://powerpoint-remote844843.android.informer.com/1.2/
如有任何設定或操作上的問題,請留這或寫信給我
2013年8月29日 星期四
WIN remote control
Set up environment
(If your version is 1.2, please upgrade to 2.0 or newer)
1 Install Java program, download link below
Download
2 Download WINRemoteService_1.0.rar to your computer and unzip it, there'll be 3 files there(winremote_1.0_x64, winremote_1.0_x86, WINRemoteService_1.0, first two files are libraries for 32/64bit, the last file is execute file for lunching service)
Download
3.Pair Bluetooth device between computer and your android phone.
Enter Control Panel -> Hardware and Sound -> Add a Bluetooth device, then computer will
find your android phone(GT-I9300 is my phone type), click it and press "next"
Press "Next" key to pair your phone
After last step, your phone will auto show the dialog box below, just click "OK" to finish pair.
All of these steps above only do one time.
============================================================
Start to Use
1.double Click WINRemoteService_1.0 to lunch service.
(rarely users see the WINRemoteService_1.0 becoming .rar extension file,
please click the file with mouse right button, choose "open with", then choose "JAVA(TM) platform SE binary)
2. Click the right-top button to connect to computer.(KANZO-AIR is my computer name)
3.If connection is successful, it will show as following.
============================================================
download WIN remote control from:
http://powerpoint-remote844843.android.informer.com/1.2/
If there're any problem about setting or use, please leave message here or mail me.
2013年8月4日 星期日
[Android] 如何監測長按結束 (Detect End of Long Press)
這個範例,我們來看看如何監看按壓按鈕的三個狀態
(This example will show you how to monitor click, long press and release button status)
1)點擊(click)
2)長按(long press)
3)放開(release)
File : MainActivity.java
(This example will show you how to monitor click, long press and release button status)
1)點擊(click)
2)長按(long press)
3)放開(release)
File : MainActivity.java
import android.os.Bundle; import android.app.Activity; import android.util.Log; import android.view.MotionEvent; import android.view.View; import android.view.View.OnClickListener; import android.view.View.OnLongClickListener; import android.view.View.OnTouchListener; import android.widget.Button; public class MainActivity extends Activity { boolean isBtnLongPressed = false; @Override protected void onCreate(Bundle savedInstanceState) { super.onCreate(savedInstanceState); setContentView(R.layout.activity_main); Button btn = (Button) findViewById(R.id.button1); btn.setOnLongClickListener(new HoldListener()); btn.setOnTouchListener(new touchListener()); btn.setOnClickListener(new clickListener()); } //監聽點擊(detect click) private class clickListener implements OnClickListener { @Override public void onClick(View view) { Log.e("log", "click button"); } } //監聽長按(detect long press) private class HoldListener implements OnLongClickListener { @Override public boolean onLongClick(View pView) { // Do something when your hold starts here. isBtnLongPressed = true; Log.e("log", "long press button"); return true; } } //監聽放開按鈕(detect release button) private class touchListener implements OnTouchListener { @Override public boolean onTouch(View pView, MotionEvent pEvent) { if (pEvent.getAction() == MotionEvent.ACTION_UP) { if (isBtnLongPressed) { // Do something when the button is released. isBtnLongPressed = false; Log.e("log", "release"); } } return false; } } }
2013年8月3日 星期六
[Android] How to add a Dropdown item on the action bar
Action Bar是android 3.0提供的一個功能,像下圖這樣
(The
這個範例將教大家,如何在Action bar上加入下拉選單
(This example will teach you how to add a dropdown item on action bar)
File : MainActivity.java
(The
Action Bar APIs were first added in Android 3.0 as following picture) 這個範例將教大家,如何在Action bar上加入下拉選單
(This example will teach you how to add a dropdown item on action bar)
File : MainActivity.java
import java.util.ArrayList; import android.os.Bundle; import android.app.ActionBar; import android.app.Activity; import android.app.ActionBar.OnNavigationListener; import android.util.Log; import android.widget.ArrayAdapter; public class MainActivity extends Activity { @Override protected void onCreate(Bundle savedInstanceState) { super.onCreate(savedInstanceState); setContentView(R.layout.activity_main); final ActionBar actionBar = getActionBar(); actionBar.setDisplayShowTitleEnabled(false); actionBar.setNavigationMode(ActionBar.NAVIGATION_MODE_LIST); ArrayListitemList = new ArrayList (); itemList.add("WMP"); itemList.add("iTunes"); itemList.add("Winamp"); ArrayAdapter adapt = new ArrayAdapter (this, android.R.layout.simple_list_item_1, android.R.id.text1, itemList); actionBar.setListNavigationCallbacks(adapt, new DropDownListenser()); } class DropDownListenser implements OnNavigationListener { public boolean onNavigationItemSelected(int itemPosition, long itemId) { if (itemPosition == 0) // windows media player { Log.e("log", "you choose WMP"); } if (itemPosition == 1) // iTunes { Log.e("log", "you choose iTunes"); } if (itemPosition == 2) // Winamp { Log.e("log", "you choose Winamp"); } return true; } } }
2013年7月31日 星期三
[Android] RelativeLayout範例介紹
在Android裡,RelativeLayout是一個最彈性的的Layout,
主要是利用上、下、左、右(above, below, left and right)來排列component的位置,
以我們這個例子來說,button2在button1的下面,button3在button2的右下方,button4在button3的右下方。
File : res/layout/main.xml
主要是利用上、下、左、右(above, below, left and right)來排列component的位置,
以我們這個例子來說,button2在button1的下面,button3在button2的右下方,button4在button3的右下方。
File : res/layout/main.xml
<RelativeLayout xmlns:android="http://schemas.android.com/apk/res/android" xmlns:tools="http://schemas.android.com/tools" android:layout_width="match_parent" android:layout_height="match_parent" > <Button android:id="@+id/button1" android:layout_width="wrap_content" android:layout_height="wrap_content" android:layout_alignParentLeft="true" android:layout_alignParentTop="true" android:text="Button1" /> <Button android:id="@+id/button2" android:layout_width="wrap_content" android:layout_height="wrap_content" android:layout_below="@+id/button1" android:text="Button2" /> <Button android:id="@+id/button3" android:layout_width="wrap_content" android:layout_height="wrap_content" android:layout_below="@+id/button2" android:layout_toRightOf="@+id/button2" android:text="Button3" /> <Button android:id="@+id/button4" android:layout_width="wrap_content" android:layout_height="wrap_content" android:layout_below="@+id/button3" android:layout_toRightOf="@+id/button3" android:text="Button4" /> </RelativeLayout>結果:
[Android] TableLayout 範例介紹
在這個例子,我們來看如何用TableLayout來排列textView和button,
及如何使用“android:layout_span”將button寬度延伸成2欄位(column),
及使用“android:layout_column”來將按鈕放到特定的欄位。
File : res/layout/main.xml
結果:
延伸閱讀: [Android] RelativeLayout範例介紹
及如何使用“android:layout_span”將button寬度延伸成2欄位(column),
及使用“android:layout_column”來將按鈕放到特定的欄位。
File : res/layout/main.xml
<?xml version="1.0" encoding="utf-8"?> <TableLayout xmlns:android="http://schemas.android.com/apk/res/android" android:id="@+id/tableLayout1" android:layout_width="fill_parent" android:layout_height="fill_parent" > <!-- 2個欄位 --> <TableRow android:id="@+id/tableRow1" android:layout_width="wrap_content" android:layout_height="wrap_content" android:padding="5dip" > <TextView android:id="@+id/textView1" android:text="第 1 欄" android:textAppearance="?android:attr/textAppearanceLarge" /> <Button android:id="@+id/button1" android:text="第 2 欄" /> </TableRow> <!-- 將按鈕延伸至2個欄位寬 --> <TableRow android:id="@+id/tableRow2" android:layout_width="wrap_content" android:layout_height="wrap_content" android:padding="5dip" > <Button android:id="@+id/button2" android:layout_span="2" android:text="第 1 和 2 欄" /> </TableRow> <!-- 3個欄位 --> <TableRow android:id="@+id/tableRow3" android:layout_width="wrap_content" android:layout_height="wrap_content" android:padding="5dip" > <TextView android:id="@+id/textView2" android:text="第 1 欄" android:textAppearance="?android:attr/textAppearanceLarge" /> <Button android:id="@+id/button2" android:text="第 2 欄" /> <Button android:id="@+id/button3" android:text="第 3 欄" /> </TableRow> <!-- 利用layout_columnundefinedbase is 0),將按鈕放在第2欄 --> <TableRow android:id="@+id/tableRow4" android:layout_width="wrap_content" android:layout_height="wrap_content" android:padding="5dip" > <Button android:id="@+id/button4" android:layout_column="1" android:text="第 2 欄" /> </TableRow> <!-- 利用layout_columnundefinedbase is 0),將按鈕放在第3欄 --> <TableRow android:id="@+id/tableRow5" android:layout_width="wrap_content" android:layout_height="wrap_content" android:padding="5dip" > <Button android:id="@+id/button5" android:layout_column="2" android:text="第 3 欄" /> </TableRow> </TableLayout>
結果:
延伸閱讀: [Android] RelativeLayout範例介紹
2013年7月21日 星期日
[Android] LinearLayout 範例介紹
LinearLayout是一個很常用的Layout,
主用是用orientation屬性來把component(如button)做垂直及水平的排列,
另外,帶有權重(weight)的component將會填滿剩餘的空間
我們來舉個例子,來看看如何把component做垂直及水平的排列,及weight如何使用
1. LinearLayout – 水平(Horizontal)
打開res/layout/main.xml,加入 android:orientation="horizontal",然後增加3個按鈕,
在這個例子中,我們將權重設在button3,所以它將會填滿剩餘的空間
res/layout/main.xml
2. LinearLayout – 垂直(Vertical)
我們把orientation改成“Vertical”
res/layout/main.xml
主用是用orientation屬性來把component(如button)做垂直及水平的排列,
另外,帶有權重(weight)的component將會填滿剩餘的空間
我們來舉個例子,來看看如何把component做垂直及水平的排列,及weight如何使用
1. LinearLayout – 水平(Horizontal)
打開res/layout/main.xml,加入 android:orientation="horizontal",然後增加3個按鈕,
在這個例子中,我們將權重設在button3,所以它將會填滿剩餘的空間
res/layout/main.xml
<LinearLayout xmlns:android="http://schemas.android.com/apk/res/android" android:layout_width="fill_parent" android:layout_height="fill_parent" android:orientation="horizontal" > <Button android:id="@+id/button1" android:layout_width="wrap_content" android:layout_height="wrap_content" android:text="Button1" /> <Button android:id="@+id/button2" android:layout_width="wrap_content" android:layout_height="wrap_content" android:text="Button2" /> <Button android:id="@+id/button3" android:layout_width="wrap_content" android:layout_height="wrap_content" android:text="Button3" android:layout_weight="1"/> </LinearLayout>結果:
2. LinearLayout – 垂直(Vertical)
我們把orientation改成“Vertical”
res/layout/main.xml
<?xml version="1.0" encoding="utf-8"?> <LinearLayout xmlns:android="http://schemas.android.com/apk/res/android" android:layout_width="fill_parent" android:layout_height="fill_parent" android:orientation="vertical" > <Button android:id="@+id/button1" android:layout_width="wrap_content" android:layout_height="wrap_content" android:text="Button1" /> <Button android:id="@+id/button2" android:layout_width="wrap_content" android:layout_height="wrap_content" android:text="Button2" /> <Button android:id="@+id/button3" android:layout_width="wrap_content" android:layout_height="wrap_content" android:text="Button3" android:layout_weight="1"/> </LinearLayout>結果:
[Android] 解決問題Your project contains errors,please fix them before running your application.
今天開啟eclipse要使用時,發現無法編譯,只出現Your project contains errors,please fix them before running your application.
檢查所有程式,也找不到任何錯誤,只有project name上出現一個紅色叉叉,
一般這個問題,可能是無法讀取R.class,我會先刪除gen\R.java檔,然後refresh
然後Project>clean整個project,最後重新編譯一次。
但這次這個方法沒用,哈
最後google發現是Debug認證已經過期,解決方法很簡單,
進入windows>Preferences>Android->Build,找到debug.keystore的路徑,刪除就可以了,
系統會在自己產生一個
檢查所有程式,也找不到任何錯誤,只有project name上出現一個紅色叉叉,
一般這個問題,可能是無法讀取R.class,我會先刪除gen\R.java檔,然後refresh
然後Project>clean整個project,最後重新編譯一次。
但這次這個方法沒用,哈
最後google發現是Debug認證已經過期,解決方法很簡單,
進入windows>Preferences>Android->Build,找到debug.keystore的路徑,刪除就可以了,
系統會在自己產生一個
2013年7月7日 星期日
[Android] adb logcat使用方法
● Logcat是一個即時觀看系統訊息(system messages)的工具,一般會利用ADB(android debug bridge)來啟動,如果是用eclipse開發,就在windows\ShowView裡,選LogCat,就可以打開了。
這裡我們利用ADB來作示範,在裝完android SDK後,裡面就會包含了ADB,
以Windows為例,adb路徑會在android-sdks\platform-tools\adb.exe,所以在開啟terminal後,要先切到這個路徑下。
而Linux,裝好SDK,開啟terminal就可以用了。
使用之前裝置端要先開啟USB偵錯模式,路徑如下,設定>開發人員選項>USB偵錯
然後在電腦端輸入
● 下列是Log class提供了幾個列印message到logcat的方法
v(String, String) (verbose)
d(String, String) (debug)
i(String, String) (information)
w(String, String) (warning)
e(String, String) (error)
一般在開發程式時,會在每個function的的第一行加上log,方便日後trace code
像下面這樣
● 如何輸出LOG呢
所以我們需要用到下列的方法過濾出我們要的部分
● 過濾log(Filtering Log Output)
每一個Android的log都包含了標籤(tag),和優先權(priority)
例如,I/MyActivity( 1557): test //I是優先權,又分成了下列幾種;MyActivity就是標籤
Android優先權:
V — Verbose (最低優先權)
D — Debug
I — Info
W — Warning
E — Error
F — Fatal
S — Silent (最高優先權,S表示不會用印出任何LOG)
為什麼分成七級呢?看到例子三就明白了
知道了android log之後,要如何過濾呢?我們用下面幾個例子來學習學習
例子一
● 延伸
一般我們在做phone的project時,就會常用到
●更多參考資料:
http://developer.android.com/tools/debugging/debugging-log.html#startingLogcat
這裡我們利用ADB來作示範,在裝完android SDK後,裡面就會包含了ADB,
以Windows為例,adb路徑會在android-sdks\platform-tools\adb.exe,所以在開啟terminal後,要先切到這個路徑下。
而Linux,裝好SDK,開啟terminal就可以用了。
使用之前裝置端要先開啟USB偵錯模式,路徑如下,設定>開發人員選項>USB偵錯
然後在電腦端輸入
$ adb devices會得到下面結果,表示已和裝置端連接成功
● 下列是Log class提供了幾個列印message到logcat的方法
v(String, String) (verbose)
d(String, String) (debug)
i(String, String) (information)
w(String, String) (warning)
e(String, String) (error)
一般在開發程式時,會在每個function的的第一行加上log,方便日後trace code
像下面這樣
Log.i("MyActivity", "test"); //log.i裡的i是指(information)LogCat就會輸出log成這樣
I/MyActivity( 1555): test
● 如何輸出LOG呢
$ adb logcat但這種方法log太多了,會印出全部的log,包含verbose/debug/information/warning/error
所以我們需要用到下列的方法過濾出我們要的部分
● 過濾log(Filtering Log Output)
每一個Android的log都包含了標籤(tag),和優先權(priority)
例如,I/MyActivity( 1557): test //I是優先權,又分成了下列幾種;MyActivity就是標籤
Android優先權:
V — Verbose (最低優先權)
D — Debug
I — Info
W — Warning
E — Error
F — Fatal
S — Silent (最高優先權,S表示不會用印出任何LOG)
為什麼分成七級呢?看到例子三就明白了
知道了android log之後,要如何過濾呢?我們用下面幾個例子來學習學習
例子一
//如果只想印出這種寫法Log.i("MyActivity", "test")的log,則要這樣寫 $ adb logcat MyActivity:I *:S //MyActivity:I是表示,印出MyActivity標籤及information優先權的log //*:S 是指其它所有的log都silent,也就是都不印出來例子二
//如果我們一次想看這2種logs,則該怎麼寫呢? //Log.i("MyActivity", "test"); //Log.d("MyActivity2", "test2"); $ adb logcat MyActivity:I MyActivity2:D *:S例子三
那如果這樣寫$ adb logcat *:W 會發生什麼事呢? 這樣就會印出所有log,且優先權在Warning以上的log,也就是Warning/Error/Fatal
● 延伸
一般我們在做phone的project時,就會常用到
$ adb logcat -v time -b radio //-v time是指出時間,-b radio是指印出radio和telephony相關訊息
●更多參考資料:
http://developer.android.com/tools/debugging/debugging-log.html#startingLogcat
2013年6月27日 星期四
[Android] Intent用法
● 呼叫電話(call a dial screen)
這裡要注意的是,"tel:"是必要的,不然會有錯誤
● 直接撥打電話(make a phone call)
如果不想要顯示撥號畫面,想直接撥打電話,則需要使用ACTION_CALL
● 呼叫瀏覽器(Browser)
加入搜尋字串
● 呼叫相機(Camera)
● 呼叫錄音機(Recorder)
● 呼叫Market應用程式(call market application)
● 顯示聯絡人清單
● 顯示地圖
延伸閱讀: 傳送郵件(Send mail)
這裡要注意的是,"tel:"是必要的,不然會有錯誤
Intent intent = new Intent(); intent.setAction(Intent.ACTION_VIEW); intent.setData(Uri.parse("tel:1234567890")); startActivity(intent);
● 直接撥打電話(make a phone call)
如果不想要顯示撥號畫面,想直接撥打電話,則需要使用ACTION_CALL
Intent intent = new Intent(); intent.setAction(Intent.ACTION_CALL); intent.setData(Uri.parse("tel:0123456789")); startActivity(intent);因為有使用到ACTION_CALL,所以要在manifest加入權限
<uses-permission android:name="android.permission.CALL_PHONE" />
● 呼叫瀏覽器(Browser)
Intent intent = new Intent(); intent.setAction(Intent.ACTION_VIEW); intent.setData(Uri.parse("http://www.acer.com")); startActivity(intent);
加入搜尋字串
Intent intent = new Intent(); intent.setAction(Intent.ACTION_WEB_SEARCH); // 設定搜尋的字串 intent.putExtra(SearchManager.QUERY, "acer"); startActivity(intent);
● 呼叫相機(Camera)
Intent intent = new Intent(); intent.setAction(MediaStore.ACTION_IMAGE_CAPTURE); startActivityForResult(intent, 1);取得拍攝後的照片
protected void onActivityResult(int requestCode, int resultCode, Intent data) { if (resultCode != RESULT_OK) { // 無法得到正確結果時會跑到這裡 return; } if (requestCode == 1) { // 這個bitmap是拍攝之照片的資料 Bitmap bitmap = (Bitmap) data.getExtras().get("data"); // 在LAYOUT拉一個ImageView,來顯示照片 ImageView imageView = (ImageView) findViewById(R.id.image); imageView.setImageBitmap(bitmap); } }
● 呼叫錄音機(Recorder)
Intent intent = new Intent(); intent.setAction(MediaStore.Audio.Media.RECORD_SOUND_ACTION); startActivity(intent);
● 呼叫Market應用程式(call market application)
Intent intent = new Intent(Intent.ACTION_VIEW); intent.setData(Uri.parse("market://details?id=comq.android.autoRedial")); startActivity(intent);
● 顯示聯絡人清單
Intent intent = new Intent(Intent.ACTION_VIEW, People.CONTENT_URI); startActivity(intent );顯示第3筆聯絡人的詳細資料
Uri uriContact = ContentUris.withAppendedId(People.CONTENT_URI, 3); //3 是聯絡人ID Intent intent = new Intent(Intent.ACTION_VIEW, uriContact ); startActivity(intent );
● 顯示地圖
Uri uri = Uri.parse("geo:25.718058,-100.279487"); Intent intent = new Intent(Intent.ACTION_VIEW, uri); startActivity(intent); //其他geo的用法 //geo:latitude,longitude <--上面例子是這個 //geo:latitude,longitude?z=zoom //geo:0,0?q=business+near+city //google.streetview:cbll=lat,lng&cbp=1,yaw,,pitch,zoom&mz=mapZoom //geo:0,0?q=my+street+address路徑規劃
Uri uri = Uri.parse("http://maps.google.com/maps?f=d&saddr=startLat%20startLng&daddr=endLat%20endLng&hl=en"); Intent intent = new Intent(Intent.ACTION_VIEW, uri); startActivity(intent );
延伸閱讀: 傳送郵件(Send mail)
2013年6月24日 星期一
[Android] 傳送郵件(Send mail)
● 傳送郵件(Send mail)
● 傳送附件(Send mail with enclosed file)
和傳送郵件不同的利用Intent.ACTION_SEND,
而附件檔案必須利用Uri型別指定。
延伸閱讀 Intent大全
Intent intent = new Intent(); intent.setAction(Intent.ACTION_SENDTO); intent.setData(Uri.parse("mailto:chenkanzo@gmail.com")); intent.putExtra(Intent.EXTRA_SUBJECT, "這裡是主旨。"); intent.putExtra(Intent.EXTRA_TEXT, "這是本文內容。"); startActivity(intent);
● 傳送附件(Send mail with enclosed file)
和傳送郵件不同的利用Intent.ACTION_SEND,
而附件檔案必須利用Uri型別指定。
Intent intent = new Intent(); intent.setAction(Intent.ACTION_SEND); String[] to = {"hoge@example.com"}; intent.putExtra(Intent.EXTRA_EMAIL, to); intent.putExtra(Intent.EXTRA_SUBJECT, "這是主旨。"); intent.putExtra(Intent.EXTRA_TEXT, "這是本文內容。"); // 選擇一張圖片來加入附件 // 取得的SD卡資料夾 File sdcard = Environment.getExternalStorageDirectory(); File file = new File(sdcard, "test.jpg"); intent.putExtra(Intent.EXTRA_STREAM, Uri.parse("file://"+ file.getAbsolutePath())); intent.setType("image/jpeg"); //呼叫應用程式列表 startActivity(Intent.createChooser(intent,"請選擇郵件應用程式,例如GMAIL"));
延伸閱讀 Intent大全
[Android] 判斷網路連線的狀況(ConnectivityManager)
● 要判斷網路連線狀態很簡單,
1.利用ConnectivityManager類別。
2.接著利用getSystemService方法,並指定引數CONNECTIVITY_SERVICE即可。
● 呼叫getACtiveNetworkInfo方法來取得目前的網路資訊,
回傳值null則表示離線狀態。
● 使用ConnectivityManager,別忘了要加權限到manifest裡
1.利用ConnectivityManager類別。
2.接著利用getSystemService方法,並指定引數CONNECTIVITY_SERVICE即可。
ConnectivityManager cm; cm = (ConnectivityManager)getSystemService(Context.CONNECTIVITY_SERVICE);
● 呼叫getACtiveNetworkInfo方法來取得目前的網路資訊,
回傳值null則表示離線狀態。
NetworkInfo NetInfo = cm.getActiveNetworkInfo(); if (NetInfo == null) { Toast.makeText(getApplicationContext(), "離線狀態", Toast.LENGTH_SHORT).show(); } else { if (NetInfo.isConnected()) { Toast.makeText(getApplicationContext(), "連線", Toast.LENGTH_SHORT).show(); } else { Toast.makeText(getApplicationContext(), "離線", Toast.LENGTH_SHORT).show(); } }
● 使用ConnectivityManager,別忘了要加權限到manifest裡
<uses-permission android:name="android.permission.ACCESS_NETWORK_STATE" />
2013年6月17日 星期一
[Android] 避免螢幕自動關閉(FLAG_KEEP_SCREEN_ON)
當我們一段時間沒有觸碰螢幕時,畫面就會自動關閉。
這對一些應用程式,例如影片播放、相機來說,畫面自動關掉就一整個糗了。
要讓螢幕不要自動關閉的方法,只要利用Window class裡的addFlag方法,
並指定FLAG_KEEP_SCREEN_ON,就可以達到目的了。
如果要回復的話,則可利用clearFlag這個方法,清掉之前設定即可。
這對一些應用程式,例如影片播放、相機來說,畫面自動關掉就一整個糗了。
要讓螢幕不要自動關閉的方法,只要利用Window class裡的addFlag方法,
並指定FLAG_KEEP_SCREEN_ON,就可以達到目的了。
@Override public void onCreate(Bundle savedInstanceState) { super.onCreate(savedInstanceState); setContentView(R.layout.main_activity); getWindow().addFlags(WindowManager.LayoutParams.FLAG_KEEP_SCREEN_ON); }
如果要回復的話,則可利用clearFlag這個方法,清掉之前設定即可。
getWindow().clearFlags(WindowManager.LayoutParams.FLAG_KEEP_SCREEN_ON);
2013年6月14日 星期五
[Android] WebView
●WebView一般是用來顯示URL,但也可以用來顯示本地端的HTML資料。
首先我們先制定一個test.html,並放到assets\資料夾下。
assets/test.html
資料夾存放路徑
●主程式中,我們會利用下列的路徑格式讀取assets裡的html
MainActivity.java
則可以先在strings.xml裡做相對應的字串
<string name="url_to_load">file:///android_asset/test_eng.html</string>
然後在程式裡利用webView.loadUrl(getString(R.string.url_to_load));讀出來。
●在layout裡加入一個webView就完成啦
activity_main.xml
●最後在AndroidManifest.xml加入INTERNET存取的權限
●結果
首先我們先制定一個test.html,並放到assets\資料夾下。
assets/test.html
<!DOCTYPE HTML> <html> <body> <p>WebView</p> <b>This is a test page</b> <p>Thanks</p> </body> </html>
資料夾存放路徑
●主程式中,我們會利用下列的路徑格式讀取assets裡的html
file:///android_asset/檔名下面程式會在程式啟動後,使用WebView顯示assets目錄下的test.html
MainActivity.java
import android.os.Bundle; import android.app.Activity; import android.webkit.WebView; public class MainActivity extends Activity { @Override protected void onCreate(Bundle savedInstanceState) { super.onCreate(savedInstanceState); setContentView(R.layout.activity_main); WebView webView = (WebView)findViewById(R.id.webView1); webView.loadUrl("file:///android_asset/test.html"); } }這裡補充一點,假如您需要多國的版本,如test_eng.html或test_tw.html
則可以先在strings.xml裡做相對應的字串
<string name="url_to_load">file:///android_asset/test_eng.html</string>
然後在程式裡利用webView.loadUrl(getString(R.string.url_to_load));讀出來。
●在layout裡加入一個webView就完成啦
activity_main.xml
<LinearLayout xmlns:android="http://schemas.android.com/apk/res/android" xmlns:tools="http://schemas.android.com/tools" android:layout_width="match_parent" android:layout_height="match_parent" android:orientation="vertical" tools:context=".MainActivity" > <WebView android:id="@+id/webView1" android:layout_width="match_parent" android:layout_height="match_parent" /> </LinearLayout>
●最後在AndroidManifest.xml加入INTERNET存取的權限
<uses-permission android:name="android.permission.INTERNET" />
●結果
2013年6月13日 星期四
[Android] Eclipse亂碼解決方法
剛get了一個source code,載入eclipse發現中文都變成亂碼,
google一下solution,在這裡記錄下來,順便分享。
其實很簡單只需將Text file encoding從MS950(繁體中文 MS Windows 作業系統的編碼),
改成UTF-8。
設定路徑,從上方選單進入Window->Preferences ->General->Workspace->UTF-8
有圖有真相
google一下solution,在這裡記錄下來,順便分享。
其實很簡單只需將Text file encoding從MS950(繁體中文 MS Windows 作業系統的編碼),
改成UTF-8。
設定路徑,從上方選單進入Window->Preferences ->General->Workspace->UTF-8
有圖有真相
2013年6月12日 星期三
[Android] NumberPicker
NumberPicker如左圖所示,
先設定一個範圍,
然後讓使用者來挑選一個數值。
這個實作方法很簡單,先設定最大最小的範圍,還有一開始的預設值
int oldValue表示調整前的值
int newValue表示調整後的值
完整source code如下
MainActivity.java
activity_main.xml
android 4.1跑出來NumberPicker是長這樣
先設定一個範圍,
然後讓使用者來挑選一個數值。
這個實作方法很簡單,先設定最大最小的範圍,還有一開始的預設值
numPicker.setMaxValue(50); numPicker.setMinValue(0); numPicker.setValue(10);接著利用setOnValueChangedListener來監看使用者選擇的值
int oldValue表示調整前的值
int newValue表示調整後的值
numPicker.setOnValueChangedListener(new NumberPicker.OnValueChangeListener (){ public void onValueChange(NumberPicker view, int oldValue, int newValue) { tv.setText("pick number is " + String.valueOf(newValue)); } });
完整source code如下
MainActivity.java
import android.os.Bundle; import android.app.Activity; import android.widget.NumberPicker; import android.widget.TextView; public class MainActivity extends Activity { public NumberPicker numPicker; public TextView tv; @Override public void onCreate(Bundle savedInstanceState) { super.onCreate(savedInstanceState); setContentView(R.layout.activity_main); tv=(TextView)findViewById(R.id.textView1); numPicker=(NumberPicker) findViewById(R.id.numberPicker1); numPicker.setMaxValue(50); numPicker.setMinValue(0); numPicker.setValue(10); //取得使用者選擇的值 numPicker.setOnValueChangedListener(new NumberPicker.OnValueChangeListener (){ public void onValueChange(NumberPicker view, int oldValue, int newValue) { tv.setText("pick number is " + String.valueOf(newValue)); } }); } }
activity_main.xml
<RelativeLayout xmlns:android="http://schemas.android.com/apk/res/android" xmlns:tools="http://schemas.android.com/tools" android:layout_width="match_parent" android:layout_height="match_parent" tools:context=".MainActivity" > <TextView android:id="@+id/textView1" android:layout_width="wrap_content" android:layout_height="wrap_content" android:layout_alignParentTop="true" android:layout_centerHorizontal="true" android:layout_marginTop="35dp" android:text="pick number is 10" android:textAppearance="?android:attr/textAppearanceLarge" /> <NumberPicker android:id="@+id/numberPicker1" android:layout_width="wrap_content" android:layout_height="wrap_content" android:layout_below="@+id/textView1" android:layout_centerHorizontal="true" android:layout_marginTop="16dp" /> </RelativeLayout>結果
android 4.1跑出來NumberPicker是長這樣
[Android] 寫檔/將資料存入Preference裡
假如我們有資料在應用程式結束後還要繼續保留,就要存放在手機裡。
一般來說,要將資料存放在手機裡,有幾個方法,如輸出到檔案,資料庫(SQL),或是Preference。
我們今天來看如何將值存放至Preference:
儲存:
取得儲存的值:
補充:
getPreferences方法的第二個參數,可以設定資料存取的權限
下面是一個完整例子
http://pianovv510.blogspot.tw/2013/04/andriod-sharedpreferences.html
一般來說,要將資料存放在手機裡,有幾個方法,如輸出到檔案,資料庫(SQL),或是Preference。
我們今天來看如何將值存放至Preference:
儲存:
// 取得Preference SharedPreferences sp; sp = getPreferences(MODE_PRIVATE); // 取得用來編輯的Editor Editor editor = sp.edit(); // 利用put方法設定Key and value editor.putBoolean("key_boolean", true); editor.putString("key_string", "aaa"); editor.putFloat("key_float", 0.01F); editor.putInt("key_int", 8888); editor.putLong("key_long", 1234L); // 儲存 editor.commit();
取得儲存的值:
// 取得Preference SharedPreferences sp; sp = getPreferences(MODE_PRIVATE); // 根據不同的型別,使用不同的get方法 // 第二個參數是用來,當讀取的KEY值不在時,指定要回傳的預值即寫在這裡 boolean m_boolean = sp.getBoolean("key_boolean", false); String m_string = sp.getString("key_string", ""); float m_float = sp.getFloat("key_float", 0); int m_int = sp.getInt("key_int", 0); long m_long = sp.getLong("key_long", 0);
補充:
getPreferences方法的第二個參數,可以設定資料存取的權限
常數
|
描述
|
MODE_PRIVATE
|
私有的,其它應用程式無法使用
|
MODE_WORLD_READABLE
|
其它應用程式可以讀取
|
MODE_WORLD_WRITABLE
|
其它應用程式可以寫入
|
下面是一個完整例子
http://pianovv510.blogspot.tw/2013/04/andriod-sharedpreferences.html
2013年5月25日 星期六
[Win32] 開關螢幕及鎖定(Screen On/Off and Lock)
開啟及關閉螢幕(Screen On/Off)
我們利用SendMessage來廣播WM_SYSCOMMAND訊息給所有視窗(windows),
然後代入SC_MONITORPOWER這個參數來設定顯示狀態,設定值如下面描述。
SC_MONITORPOWER
下面是程式碼片段,注意最後一個參數的設定,代表不同功能。
鎖定(Lock)
鎖定的功能就和按下 Ctrl+Alt+Del,然後在選擇"鎖定"一樣
我們利用SendMessage來廣播WM_SYSCOMMAND訊息給所有視窗(windows),
然後代入SC_MONITORPOWER這個參數來設定顯示狀態,設定值如下面描述。
SC_MONITORPOWER
- -1 (開啟螢幕)
- 1 (讓螢幕處於低耗電量)
- 2 (關閉螢幕)
下面是程式碼片段,注意最後一個參數的設定,代表不同功能。
void screenOff() { SendMessage(HWND_BROADCAST, WM_SYSCOMMAND, SC_MONITORPOWER,(LPARAM)2); } void screenOn() { SendMessage(HWND_BROADCAST, WM_SYSCOMMAND, SC_MONITORPOWER,(LPARAM)-1); } void screenLowPower() { SendMessage(HWND_BROADCAST, WM_SYSCOMMAND, SC_MONITORPOWER,(LPARAM)1); }
鎖定(Lock)
鎖定的功能就和按下 Ctrl+Alt+Del,然後在選擇"鎖定"一樣
void lock() { LockWorkStation(); }
[Win32] 關機及重開機(shutdown and restart)
關機和重開機(shutdown and restart)首先要先調高你的程序(process)到可以關機及重開機的權限,
然後在利用這個InitiateSystemShutdown API來達到關機和重開的功能。
我們來介紹一下InitiateSystemShutdown這個API,依照MSDN的描述,
BOOL WINAPI InitiateSystemShutdown(
_In_opt_ LPTSTR lpMachineName,
_In_opt_ LPTSTR lpMessage,
_In_ DWORD dwTimeout,
_In_ BOOL bForceAppsClosed,
_In_ BOOL bRebootAfterShutdown
);
lpMachineName [in, optional]: 如果您想要關閉另一台電腦,在這裡則要輸入那台電腦的網路名稱;反之如果設成NULL,則表示關閉當下這台電腦。
lpMessage [in, optional]: 這裡是用來設定關機對話框的內容描述。
dwTimeout [in]: 搭配第二個參數,用來設定對話框的停留的時間,如果設定成零的話,就不會顯示對話框,然後直接關機。
bForceAppsClosed [in]:如果為TRUE,應用程式不會被存檔,即會強迫馬上關機,所以資料有可能會遺失。
如果為FALSE,系統會顯示一個對話框,來引導使用者去關閉其它已開啟的應用程式。
bRebootAfterShutdown [in]:如果為TRUE為重開的意思,如果為FALSE則是關機。
程式碼如下:
void shutdown() { HANDLE hToken; TOKEN_PRIVILEGES tkp; BOOL fResult; // Get the current process token handle so we can get shutdown privilege. if (!OpenProcessToken(GetCurrentProcess(),TOKEN_ADJUST_PRIVILEGES | TOKEN_QUERY, &hToken)) printf("OpenProcessToken failed."); // Get the LUID for shutdown privilege. LookupPrivilegeValue(NULL, SE_SHUTDOWN_NAME,&tkp.Privileges[0].Luid); tkp.PrivilegeCount = 1; // one privilege to set tkp.Privileges[0].Attributes = SE_PRIVILEGE_ENABLED; // Get shutdown privilege for this process. AdjustTokenPrivileges(hToken, FALSE, &tkp, 0, (PTOKEN_PRIVILEGES) NULL, 0); if (GetLastError() != ERROR_SUCCESS) printf("AdjustTokenPrivileges enable failed."); fResult = InitiateSystemShutdown( NULL, NULL, 0, FALSE, FALSE); //最後一個參數,TRUE表示重開機,FASLE表示關機 if (!fResult) { printf("InitiateSystemShutdown failed."); } // Disable shutdown privilege. tkp.Privileges[0].Attributes = 0; AdjustTokenPrivileges(hToken, FALSE, &tkp, 0,(PTOKEN_PRIVILEGES) NULL, 0); if (GetLastError() != ERROR_SUCCESS) { printf("AdjustTokenPrivileges disable failed."); } }
[Win32] 休眠及睡眠(hibernate and suspend)
剛好用到幾個電源管理的APIs,先簡單介紹一下休眠及睡眠。
休眠和睡眠有什麼不同呢?
睡眠(suspend)會讓電腦處於一個低耗電量的模式,但當電源被用光時,
電腦還是會關機的,所以沒有被儲存的資料還是會遺失。
休眠(hibernate)則會將電腦當下的狀態存到硬碟裡,然後power off;
當喚醒時(resume),則會回存power off前狀態到記憶體裡(RAM)。
舉個例子,當你開啟了office word和excel,然後按下休眠,再喚醒時,依然會看到word和excel;
反之,如果是重開機,就看不到啦。
實作上會用到一個API,SetSuspendState
BOOLEAN WINAPI SetSuspendState(
_In_ BOOLEAN Hibernate,
_In_ BOOLEAN ForceCritical,
_In_ BOOLEAN DisableWakeEvent
);
Hibernate [in] : 如果是TRUE,系統將進入hibernates;反之則是suspended。
ForceCritical [in] : 如果是TRUE,系統則立刻suspend;
反之系統會先廣播一個PBT_APMQUERYSUSPEND事件給每一個應用程式,請求要suspend的權限。
DisableWakeEvent [in] : 如果是TRUE,系統將關掉所有wake event,反之wake events得是開啟的。
程式碼如下:
void suspend() { //If the first parameter is TRUE, the system hibernates. //If the parameter is FALSE, the system is suspended. SetSuspendState(FALSE, TRUE, FALSE); } void hibernation() { SetSuspendState(TRUE, TRUE, FALSE); }
2013年5月19日 星期日
[Android] 計時器(Chronometer)
1.在使用計時器時,有一個地方需要注意,
就是setBase,這個方法是用來設定一個基準點,也就是我從這個基準點開始計時。
假設我們的程式是這樣寫,就會發生問題,
當我們呼叫start()後,等到過了25秒,按下停止,
再過了15秒後,我們再按下開始讓它繼續計時,
就會發現不是從25秒往下算,而是從40秒開始算。
這是因為計時器從第一次按下開始的時間做為基準點,所以是40秒(25+15)
2.為了解決上述的問題,我們需要額外利用一個參數(escapeTime)及setBase方法
在按下停止時先記錄已經跑過的時間,
然後待下一次按開始繼續計時的時候,在加上去
MainActivity.java
3.layout即拉入一個計時器,三個按鈕。
res/layout/activity_main.xml
就是setBase,這個方法是用來設定一個基準點,也就是我從這個基準點開始計時。
假設我們的程式是這樣寫,就會發生問題,
當我們呼叫start()後,等到過了25秒,按下停止,
再過了15秒後,我們再按下開始讓它繼續計時,
就會發現不是從25秒往下算,而是從40秒開始算。
這是因為計時器從第一次按下開始的時間做為基準點,所以是40秒(25+15)
btnStart.setOnClickListener(new OnClickListener() { @Override public void onClick(View arg0) { chronometer.start(); } }); btnStop.setOnClickListener(new OnClickListener() { @Override public void onClick(View arg0) { chronometer.stop(); } });
2.為了解決上述的問題,我們需要額外利用一個參數(escapeTime)及setBase方法
在按下停止時先記錄已經跑過的時間,
然後待下一次按開始繼續計時的時候,在加上去
MainActivity.java
import android.app.Activity; import android.os.Bundle; import android.os.SystemClock; import android.view.View; import android.view.View.OnClickListener; import android.widget.Button; import android.widget.Chronometer; public class MainActivity extends Activity { long escapeTime = 0; /* Called when the activity is first created. */ @Override public void onCreate(Bundle savedInstanceState) { super.onCreate(savedInstanceState); setContentView(R.layout.activity_main); final Chronometer chronometer = (Chronometer) findViewById(R.id.chronometer1); final Button btnStart = (Button) findViewById(R.id.button1); final Button btnStop = (Button) findViewById(R.id.button2); final Button btnReset = (Button) findViewById(R.id.button3); btnStart.setOnClickListener(new OnClickListener() { @Override public void onClick(View arg0) { // SystemClock.elapsedRealtime()方法會回傳從開機到現在的時間 // 把這個時間做為一個Base,從這個Base開始計時 chronometer.setBase(SystemClock.elapsedRealtime() + escapeTime); chronometer.start(); } }); btnStop.setOnClickListener(new OnClickListener() { @Override public void onClick(View arg0) { //getBase是用來取得上一次setBase()的時間"chronometer.setBase(SystemClock.elapsedRealtime() + escapeTime);" escapeTime = chronometer.getBase() - SystemClock.elapsedRealtime(); chronometer.stop(); } }); btnReset.setOnClickListener(new OnClickListener() { @Override public void onClick(View arg0) { chronometer.setBase(SystemClock.elapsedRealtime()); chronometer.stop(); escapeTime = 0; } }); } }
3.layout即拉入一個計時器,三個按鈕。
res/layout/activity_main.xml
<LinearLayout xmlns:android="http://schemas.android.com/apk/res/android" xmlns:tools="http://schemas.android.com/tools" android:id="@+id/LinearLayout1" android:layout_width="match_parent" android:layout_height="match_parent" android:orientation="vertical" > <Chronometer android:id="@+id/chronometer1" android:layout_width="wrap_content" android:layout_height="wrap_content" android:layout_marginTop="14dp" android:text="Chronometer" /> <Button android:id="@+id/button1" android:layout_width="wrap_content" android:layout_height="wrap_content" android:layout_marginTop="16dp" android:text="開始(start)" /> <Button android:id="@+id/button2" android:layout_width="wrap_content" android:layout_height="wrap_content" android:layout_marginTop="16dp" android:text="停止(stop)" /> <Button android:id="@+id/button3" android:layout_width="wrap_content" android:layout_height="wrap_content" android:layout_marginTop="18dp" android:text="重置(reset)" /> </LinearLayout>結果:
2013年5月17日 星期五
[Android] 鬧鐘(AlarmMamager and PendingIntent) 下篇
呈上篇鬧鐘的片段
當我們設定鬧鐘後,如果想取消的話呢?
很簡單,只要呼叫cancel function即可
那如何確認鬧鐘是否真的被取消呢?
主要是利用PendingIntent.FLAG_NO_CREATE這個參數,
當被包起來的Inent不存在,得回傳null
Intent intent = new Intent(MainActivity.this,
PlayReceiver.class);
intent.putExtra("msg", "play_voice");
intent.addCategory(String.valueOf(SystemClock.elapsedRealtime()));
long elapsed = SystemClock.elapsedRealtime() + 60 * 1000; // millis
PendingIntent pi = PendingIntent.getBroadcast(
MainActivity.this, 1, intent,
PendingIntent.FLAG_UPDATE_CURRENT);
AlarmManager am = (AlarmManager) getSystemService(ALARM_SERVICE);
am.set(AlarmManager.ELAPSED_REALTIME_WAKEUP, elapsed, pi);
當我們設定鬧鐘後,如果想取消的話呢?
很簡單,只要呼叫cancel function即可
am.cancel(pi);
那如何確認鬧鐘是否真的被取消呢?
主要是利用PendingIntent.FLAG_NO_CREATE這個參數,
當被包起來的Inent不存在,得回傳null
boolean alarmUp = (PendingIntent.getBroadcast(MainActivity.this, 1,
intent, PendingIntent.FLAG_NO_CREATE) != null);
if (alarmUp)
Log.d("myTag", "Alarm is already active");
else
Log.d("myTag", "Alarm is not already active");
2013年5月16日 星期四
[Android] 鬧鐘(AlarmMamager and PendingIntent) 上篇
我們利用AlarmManager實作一個鬧鐘,
讓他在開機後1分鐘後,發出鈴響。
只要利用PendingIntent及AlarmManager就可以做到這樣的功能。
1. MainActivity.java
一般的Intent,用startActivity(intent)就會直接去啟動和intent。
PendingIntent可以想成延遲Intent,它則是先把某個Intent包好,丟給某個程式,等到一段時間後再去執行Intent。
這裡有一點要注意,當 AlarmManager 執行 set() 時,Android 系統會比對已註冊的其他 Intent 的 action、data、type、class、category, 如果這幾個屬性完全相同,則系統會將這兩個 Intent 視為一樣, 這時系統會視 PendingIntent.FLAG_xxx 參數以決定如何處理這個新註冊的 Intent 。
2.接下來建立接收廣播的class:
PlayReceiver.java
3. 在Layout裡加入一個按鈕, 來啟動鬧鐘
reference
http://oldgrayduck.blogspot.tw/2012/10/androidalarmmanager.html
讓他在開機後1分鐘後,發出鈴響。
只要利用PendingIntent及AlarmManager就可以做到這樣的功能。
1. MainActivity.java
import android.os.Bundle; import android.os.SystemClock; import android.app.Activity; import android.app.AlarmManager; import android.app.PendingIntent; import android.content.Intent; import android.view.View; import android.widget.Button; public class MainActivity extends Activity { Button mButton; @Override protected void onCreate(Bundle savedInstanceState) { super.onCreate(savedInstanceState); setContentView(R.layout.activity_main); mButton = (Button) findViewById(R.id.button1); mButton.setOnClickListener(new Button.OnClickListener() { @Override public void onClick(View v) { Intent intent = new Intent(MainActivity.this, PlayReceiver.class); intent.putExtra("msg", "play_voice"); intent.addCategory(String.valueOf(SystemClock.elapsedRealtime())); //SystemClock.elapsedRealtime()會回傳從開機到現在當下所花的時間,手機進入睡眠時間也算在內(單位milliseconds) long elapsed = SystemClock.elapsedRealtime() + 60 * 1000; //60秒 // 發送一個broadcast,類似 Context.sendBroadcast() // PendingIntent.FLAG_UPDATE_CURRENT參數表示,如果已存在 PendingIntent,就更新 extra data. PendingIntent pi = PendingIntent.getBroadcast(MainActivity.this, 1, intent, PendingIntent.FLAG_UPDATE_CURRENT); AlarmManager am = (AlarmManager) getSystemService(ALARM_SERVICE); am.set(AlarmManager.ELAPSED_REALTIME_WAKEUP, elapsed , pi); } }); } }那Intent,和PendingIntent有什麼不同呢?
一般的Intent,用startActivity(intent)就會直接去啟動和intent。
PendingIntent可以想成延遲Intent,它則是先把某個Intent包好,丟給某個程式,等到一段時間後再去執行Intent。
am.set(AlarmManager.ELAPSED_REALTIME_WAKEUP, elapsed , pi);等到第二個參數(elapsed)所設定的時間到達時,就會執行pi這個PendingIntent
這裡有一點要注意,當 AlarmManager 執行 set() 時,Android 系統會比對已註冊的其他 Intent 的 action、data、type、class、category, 如果這幾個屬性完全相同,則系統會將這兩個 Intent 視為一樣, 這時系統會視 PendingIntent.FLAG_xxx 參數以決定如何處理這個新註冊的 Intent 。
2.接下來建立接收廣播的class:
PlayReceiver.java
import android.content.BroadcastReceiver; import android.content.Context; import android.content.Intent; import android.media.AudioManager; import android.media.SoundPool; import android.os.Bundle; public class PlayReceiver extends BroadcastReceiver { private SoundPool sp; private int sourceid; @Override public void onReceive(Context context, Intent intent) { Bundle bData = intent.getExtras(); if (bData.get("msg").equals("play_voice")) { sp = new SoundPool(10, AudioManager.STREAM_MUSIC, 5); sourceid = sp.load(context, R.raw.harm, 1); playSounds(1, context); } } public void playSounds(int repeatTime, Context context) { AudioManager am = (AudioManager) context.getApplicationContext() .getSystemService(Context.AUDIO_SERVICE); // 獲取最大音量 float audMaxVolumn = am.getStreamMaxVolume(AudioManager.STREAM_MUSIC); // 獲取目前音量 float audCurrentVolumn = am.getStreamVolume(AudioManager.STREAM_MUSIC); // 左右聲道值範圍為 0.0 - 1.0 float volRatio = audCurrentVolumn / audMaxVolumn; // 下面參數分別為播放音頻,左聲道,右聲道,設置優先級,重撥次數,速率(速率最低0.5,最高為2,1代表正常速度) sp.play(sourceid, volRatio, volRatio, 1, repeatTime, 1); } }播放音效的作法,請參考先前的文章
3. 在Layout裡加入一個按鈕, 來啟動鬧鐘
<RelativeLayout xmlns:android="http://schemas.android.com/apk/res/android" xmlns:tools="http://schemas.android.com/tools" android:layout_width="match_parent" android:layout_height="match_parent" tools:context=".MainActivity" > <Button android:id="@+id/button1" android:layout_width="wrap_content" android:layout_height="wrap_content" android:layout_centerHorizontal="true" android:layout_centerVertical="true" android:layout_marginBottom="54dp" android:text="1分鍾後,鬧鍾啟動" /> </RelativeLayout>4. 最後在AndroidManifest.xml 的 application 區段寫入要接收廣播的程式:
<receiver android:name="com.example.s.PlayReceiver" > <intent-filter> <action android:name="play_voice" /> </intent-filter> </receiver>
reference
http://oldgrayduck.blogspot.tw/2012/10/androidalarmmanager.html
2013年5月12日 星期日
[Android] 避免彈出的鍵盤檔到EditText (Move layouts up when soft keyboard is displayed)
有時候當鍵盤彈出的時候,會擋到輸入文字的欄位(EditText),
像下面這張圖一樣,輸入Number的欄位有一小部分被鍵盤檔住了。
為避免這樣的情形,我們可以在AndroidManifest.xml,
加入android:windowSoftInputMode="adjustPan",
這個屬性會保持您的游標所在處,不會被鍵盤給檔住,
所以使用者可以看到他正在輸入的文字。
結果:
我們可以看到當鍵盤彈出時,
整個畫面layout會被向上推,
所以輸入欄位的地方就不會被擋到啦。
像下面這張圖一樣,輸入Number的欄位有一小部分被鍵盤檔住了。
為避免這樣的情形,我們可以在AndroidManifest.xml,
加入android:windowSoftInputMode="adjustPan",
這個屬性會保持您的游標所在處,不會被鍵盤給檔住,
所以使用者可以看到他正在輸入的文字。
<activity name="MainActivity" android:windowSoftInputMode="adjustPan"> ... </activity>
結果:
我們可以看到當鍵盤彈出時,
整個畫面layout會被向上推,
所以輸入欄位的地方就不會被擋到啦。
2013年5月9日 星期四
[Android] 撥打電話(make a phone call)
-需繼承PhoneStateListener監聽通話狀態(接通/閒置/來電)
-需在AndroidManifest.xml加入android.permission.CALL_PHONE和android.permission.READ_PHONE_STATE二個權限。
1.MainActivity.java
2.在EditText裡需加入inputType="phone"屬性,這是為了啟動電話的鍵盤的風格。
main.xml
-需在AndroidManifest.xml加入android.permission.CALL_PHONE和android.permission.READ_PHONE_STATE二個權限。
1.MainActivity.java
import android.app.Activity; import android.content.Context; import android.content.Intent; import android.net.Uri; import android.os.Bundle; import android.telephony.PhoneStateListener; import android.telephony.TelephonyManager; import android.util.Log; import android.view.View; import android.view.View.OnClickListener; import android.widget.Button; import android.widget.EditText; public class MainActivity extends Activity { final Context context = this; private Button button; private EditText editText; public void onCreate(Bundle savedInstanceState) { super.onCreate(savedInstanceState); setContentView(R.layout.main); button = (Button) findViewById(R.id.buttonCall); editText=(EditText)findViewById(R.id.editText1); Log.e("log", this.toString()); // 初始電話服務功能 PhoneCallListener phoneListener = new PhoneCallListener(); TelephonyManager telephonyManager = (TelephonyManager) this .getSystemService(Context.TELEPHONY_SERVICE); telephonyManager.listen(phoneListener, PhoneStateListener.LISTEN_CALL_STATE); // 監聽按鈕 button.setOnClickListener(new OnClickListener() { @Override public void onClick(View arg0) { Intent callIntent = new Intent(Intent.ACTION_CALL); callIntent.setData(Uri.parse("tel:"+editText.getText().toString())); startActivity(callIntent); } }); } private class PhoneCallListener extends PhoneStateListener { private boolean isPhoneCalling = false; @Override public void onCallStateChanged(int state, String incomingNumber) { if (TelephonyManager.CALL_STATE_RINGING == state) { // 來電時 Log.i("Log", "RINGING, number: " + incomingNumber); } if (TelephonyManager.CALL_STATE_OFFHOOK == state) { // 通話中 isPhoneCalling = true; } if (TelephonyManager.CALL_STATE_IDLE == state) { // 結束通話時 if (isPhoneCalling) { // 重新啟動APP,這裡的目的是要回到activity畫面 // 如果沒有這一段,通話結束則會停在通話明細的畫面(call list) Intent i = getBaseContext().getPackageManager() .getLaunchIntentForPackage( getBaseContext().getPackageName()); i.addFlags(Intent.FLAG_ACTIVITY_CLEAR_TOP |Intent.FLAG_ACTIVITY_SINGLE_TOP ); startActivity(i); isPhoneCalling = false; } } } } }
2.在EditText裡需加入inputType="phone"屬性,這是為了啟動電話的鍵盤的風格。
main.xml
<?xml version="1.0" encoding="utf-8"?> <RelativeLayout xmlns:android="http://schemas.android.com/apk/res/android" android:id="@+id/RelativeLayout1" android:layout_width="fill_parent" android:layout_height="fill_parent" android:orientation="vertical" > <Button android:id="@+id/buttonCall" android:layout_width="wrap_content" android:layout_height="wrap_content" android:layout_alignParentRight="true" android:layout_alignParentTop="true" android:layout_marginTop="42dp" android:layout_toRightOf="@+id/editText1" android:text="CALL" /> <EditText android:id="@+id/editText1" android:layout_width="wrap_content" android:layout_height="wrap_content" android:layout_alignBottom="@+id/buttonCall" android:layout_alignParentLeft="true" android:ems="10" android:inputType="phone" /> </RelativeLayout>3.AndroidManifest.xml
<?xml version="1.0" encoding="utf-8"?> <manifest xmlns:android="http://schemas.android.com/apk/res/android" package="com.example.phonecall" android:versionCode="1" android:versionName="1.0" > <uses-sdk android:minSdkVersion="10" /> <uses-permission android:name="android.permission.CALL_PHONE" /> <uses-permission android:name="android.permission.READ_PHONE_STATE" /> <application android:icon="@drawable/ic_launcher" android:label="@string/app_name" > <activity android:label="@string/app_name" android:name=".MainActivity" > <intent-filter > <action android:name="android.intent.action.MAIN" /> <category android:name="android.intent.category.LAUNCHER" /> </intent-filter> </activity> </application> </manifest>結果:
2013年5月8日 星期三
[Android] 檢查SIM卡是否存在(Check if SIM Card Exists)
利用TELEPHONY_SERVICE來獲得電話的相關資訊,
如SIM卡狀態,來電狀態(如通話中或閒置),
網路型態(GPRS/HSDPA),IMEI,IMSI及手機的電話號碼...等等
簡單的例子如下
More details
http://developer.android.com/reference/android/telephony/TelephonyManager.html
網路型態(GPRS/HSDPA),IMEI,IMSI及手機的電話號碼...等等
簡單的例子如下
TelephonyManager tm = (TelephonyManager) this.getSystemService(Context.TELEPHONY_SERVICE); if (tm.getSimState() != TelephonyManager.SIM_STATE_ABSENT){ //SIM卡存在 } else { //沒有SIM卡 }
More details
http://developer.android.com/reference/android/telephony/TelephonyManager.html
[Android] 放置廣告到APP(Admob BANNER)
一般在APP裡會看到有橫幅廣告出現在上面或下面,那就稱為banner。
基本上有5個步驟:
1.首先需先申請一個admob的帳號,申請完後會得到一組號碼,類似a150e6a6xxxxxxx。
2.下載Google AdMob Ads SDK(下載連結), 解壓縮後會得到一個GoogleAdMobAdsSdk-x.x.x.jar,將這個檔案放到project的libs資料夾下。
3.加入下面codes到onCreate
4.加入一個linearLayout來放置橫幅廣告
res/layout/activity_main.xml
5.AndroidManifest.xml需加入二個permission及一個ads的activity
結果:
避免廣告之嫌,所以馬塞克處理,呵
基本上有5個步驟:
1.首先需先申請一個admob的帳號,申請完後會得到一組號碼,類似a150e6a6xxxxxxx。
2.下載Google AdMob Ads SDK(下載連結), 解壓縮後會得到一個GoogleAdMobAdsSdk-x.x.x.jar,將這個檔案放到project的libs資料夾下。
@Override public void onCreate(Bundle savedInstanceState) { super.onCreate(savedInstanceState); setContentView(R.layout.media); //初始橫幅廣告 //a150e6a6xxxxxxx則是你申請的那一組ID AdView adView = new AdView(this, AdSize.SMART_BANNER, "a150e6a6xxxxxxx"); LinearLayout layout = (LinearLayout) findViewById(R.id.ads); layout.addView(adView); adView.loadAd(new AdRequest()); }
4.加入一個linearLayout來放置橫幅廣告
res/layout/activity_main.xml
<?xml version="1.0" encoding="utf-8"?> <LinearLayout xmlns:android="http://schemas.android.com/apk/res/android" android:id="@+id/RelativeLayout1" android:layout_width="fill_parent" android:layout_height="fill_parent" android:background="#000000" android:orientation="vertical" > <LinearLayout android:id="@+id/ads" android:layout_width="fill_parent" android:layout_height="wrap_content" > </LinearLayout> </LinearLayout>
5.AndroidManifest.xml需加入二個permission及一個ads的activity
<?xml version="1.0" encoding="utf-8"?> <manifest xmlns:android="http://schemas.android.com/apk/res/android" package="com.example.vvvvvv" android:versionCode="1" android:versionName="1.0"> <application android:icon="@drawable/ic_launcher" android:label="@string/app_name"> <activity android:name="com.example.vvvvvv.MainActivity" android:label="@string/app_name"> <intent-filter> <action android:name="android.intent.action.MAIN" /> <category android:name="android.intent.category.LAUNCHER" /> </intent-filter> </activity> <activity android:name="com.google.ads.AdActivity" android:configChanges="keyboard|keyboardHidden|orientation|screenLayout|uiMode|screenSize|smallestScreenSize"/> </application> <uses-permission android:name="android.permission.ACCESS_NETWORK_STATE"/> <uses-permission android:name="android.permission.INTERNET"/> </manifest>
結果:
避免廣告之嫌,所以馬塞克處理,呵
2013年5月7日 星期二
[Android] 長按選單(ContextMenu)
長按螢幕出現的選單,有點類似滑鼠右鍵選單。
不過平版或手機沒有滑鼠,所以則需要用長按的方法叫出選單。
MainActivity.java
我們希望在畫面任何一個地方按下去,都會出現長按選單,
所以要在這裡加入ID。如:android:id="@+id/relativelayout"
activity_main.xml
結果:
不過平版或手機沒有滑鼠,所以則需要用長按的方法叫出選單。
MainActivity.java
import android.app.Activity; import android.os.Bundle; import android.view.ContextMenu; import android.view.ContextMenu.ContextMenuInfo; import android.view.Menu; import android.view.MenuItem; import android.view.View; import android.widget.Toast; public class MainActivity extends Activity { protected static final int MENU_BUTTON_1 = Menu.FIRST; protected static final int MENU_BUTTON_2 = Menu.FIRST + 1; protected static final int MENU_BUTTON_3 = Menu.FIRST + 2; protected static final int MENU_BUTTON_4 = Menu.FIRST + 3; /* Called when the activity is first created. */ @Override public void onCreate(Bundle savedInstanceState) { super.onCreate(savedInstanceState); setContentView(R.layout.activity_main); //註冊長按選單 registerForContextMenu(findViewById(R.id.relativelayout)); } @Override public void onCreateContextMenu(ContextMenu menu, View v, ContextMenuInfo menuInfo) { //設定選單內容 menu.setHeaderTitle("挑選您要的顏色"); menu.add(0, MENU_BUTTON_1, 0, "紅"); menu.add(0, MENU_BUTTON_2, 0, "橙"); menu.add(0, MENU_BUTTON_3, 0, "黃"); menu.add(0, MENU_BUTTON_4, 0, "綠"); super.onCreateContextMenu(menu, v, menuInfo); } @Override public boolean onContextItemSelected(MenuItem item) { // 點選項目後,要做的事寫在這邊 switch(item.getItemId()) { case MENU_BUTTON_1: Toast.makeText(getApplicationContext(), "您選了紅色", Toast.LENGTH_SHORT).show(); break; case MENU_BUTTON_2: Toast.makeText(getApplicationContext(), "您選了橙色", Toast.LENGTH_SHORT).show(); break; case MENU_BUTTON_3: Toast.makeText(getApplicationContext(), "您選了黃色", Toast.LENGTH_SHORT).show(); break; case MENU_BUTTON_4: Toast.makeText(getApplicationContext(), "您選了綠色", Toast.LENGTH_SHORT).show(); break; default: break; } return super.onContextItemSelected(item); } }
我們希望在畫面任何一個地方按下去,都會出現長按選單,
所以要在這裡加入ID。如:android:id="@+id/relativelayout"
activity_main.xml
<RelativeLayout xmlns:android="http://schemas.android.com/apk/res/android" xmlns:tools="http://schemas.android.com/tools" android:layout_width="match_parent" android:layout_height="match_parent" android:id="@+id/relativelayout" > <TextView android:id="@+id/textView1" android:layout_width="wrap_content" android:layout_height="wrap_content" android:layout_alignParentTop="true" android:layout_centerHorizontal="true" android:layout_marginTop="152dp" android:text="請長按螢幕" android:textAppearance="?android:attr/textAppearanceLarge" /> </RelativeLayout>
結果:
訂閱:
文章 (Atom)